18th October
Wabi Sabi mini workshop with Bex Raven


15th February and 15th March 2018
Mini workshop - 'Free Machine Strips' +' Binding and More'


20th April 2017
4 Square Mini Workshop - Ruth Dalby
 Each member had to pick a piece of paper from 4 different pots - each had a different stitch on it.
We then drew a square (set size) on to our fabric and divided it into 4 smaller squares.
A colour of thread was selected eg green and different thickness /textures of thread were collected together.
 Starting in one of the small squares, at the outside edge, using the thickest thread and one of the stitches 'picked', work approx 4 stitches of different sizes, then move to the next square , use the same thread but a different stitch and repeat the process.
 Continue in each of the 4 squares, then select next thickness of thread and repeat the process using the stitch previously used in the square.
Continue until each square is filled, then select a button and sew on in the middle of the large square, outline the original square with stitch as desired.


 23 rd February 2017
Free Machine Embroidery Flowers with Clair Muir
Clair brought an large range of machine threads for us to use


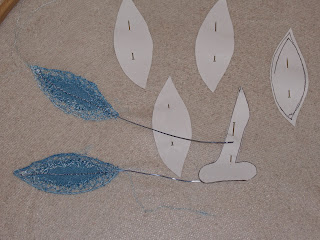 The first stage was to create flower pattern pieces and pin on to the washable/disolveable fabric positioned in the hoop.
 Having set up the machine for free embroidery we outlined the flower petal pieces and then filled them in making sure the stitches overlapped otherwise when thew fabric was washed the petals would fall apart.

 Then the central wire was machined into position(care required to avoid needle damage!) a long piece was required in order to create the flower and its stem.


21st and 22nd April
Creative Surfaces workshop - 1 . 5 days


19th November
Mini Workshop

12th November
Workshop -Inspiration Day with Maryke

15th October
Mini Workshop with Marianne Grime
 'Curly Ribbon Trees'

28th /29th May
2 Day workshop with Isobel Hall
(at Adderley Village Hall)
'Working with Cocoon strippings for Medieval book covers and bags'
16th April
Mini workshop with Brenda Scarman

The main technique for this workshop is to use Detached Buttonhole
Stitch to fill the petal shapes of the Tudor Rose. This stitch formed
the main part of the elaborate shapes found in costumes of the first
Elizabethan era, which were highly decorated, and had gold thread and
spangles (sequins) applied, making them very colourful. A modern version
of a Chatelaine is what has inspired the designs for this workshop
Our challenge was to make the scissor keeper from the chatelaine,creating the rose using chain stitch, detached buttonhole stitch, enhancing the design with sequins and beads and completing the case lining with satin and sewing together.


26th March
Full day - 'Book Structure for Embroidery and Textile Artists'
with Mary Sleigh
 NB Brick to weight down is also needed
19th February 2015
'
Wessex Work' mini workshop with Sue Jones
Margaret
Foster (1843-1936) lived in Bath and continued
stitching well into her 90’s. She called her creation "stitchery"
rather than "embroidery" and it became known as "Wessex
Stitchery" because this was the region she resided in. Wessex in Saxon times was the centre of needlework and the
art of illumination and Margaret Foster gave names to different patterns,
including places of interest and old stories. She made a point of using only
British materials in her work.
Wessex Stitch was a technique that used a limited number of stitches
combined in a great variety of patterns to give surprising decorative effects. Margaret
loved colour
and wasn’t afraid to use it in her designs. (She was not fond of the stamped
work being done at that time and so she went her own way) Also, the backs of her work were not neat as
she carried thread across the back between motifs.
 Margaret produced 300 pieces of work for her exhibition in the 1930’s. At that time she was the only person doing
Wessex Stitch. She had a vast knowledge of stitches and techniques like
Elizabethan Blackwork and developed her ideas. She even wrote her own catalogue
for the exhibition
Margaret produced 300 pieces of work for her exhibition in the 1930’s. At that time she was the only person doing
Wessex Stitch. She had a vast knowledge of stitches and techniques like
Elizabethan Blackwork and developed her ideas. She even wrote her own catalogue
for the exhibition
Little is known of Margaret Foster the person, but thanks to her sister
who donated her samples to Gawthorpe Hall; her work is available for all
interested stitchers to see.
 Having introduced us to the work of Margaret Sue distributed
the resource packs containing information about the stitch we were going to
focus on, sample fabric and thread to practice
on in order to familiarise ourselves with the technique and a larger piece of
fabric to work our design on. Sue had also brought a lovely colourful selection
of threads, plus needles and frames for those without.
Having introduced us to the work of Margaret Sue distributed
the resource packs containing information about the stitch we were going to
focus on, sample fabric and thread to practice
on in order to familiarise ourselves with the technique and a larger piece of
fabric to work our design on. Sue had also brought a lovely colourful selection
of threads, plus needles and frames for those without.
The workshop was informative and enjoyable but required
concentration in order to count threads to ensure the evenness of the stitches
and design. Requests were made for a further session using a different stitch
of stitches.


15th January 2015
‘Little Silky Pictures’ mini workshop with Trisha James


20th November
‘Let's Get Knotted’ mini workshop with Val Mackin
 The aim is for everyone to have fun whilst learning to tie a variety of knots. Start with a Carrick knot and make a coaster to ensure understanding of how the knot is formed.
Other knots like the Turks Head, Ocean Mat and Lanyard knot can be tried.


13th
November
 ‘Two Stitches’ workshop with Sylvia Stead
Sylvia brought in many pieces of her work as well as a selection of threads, ribbon etc together with her collection of stitch samples to give us ideas about how we could vary each stitch and create different effects with it.


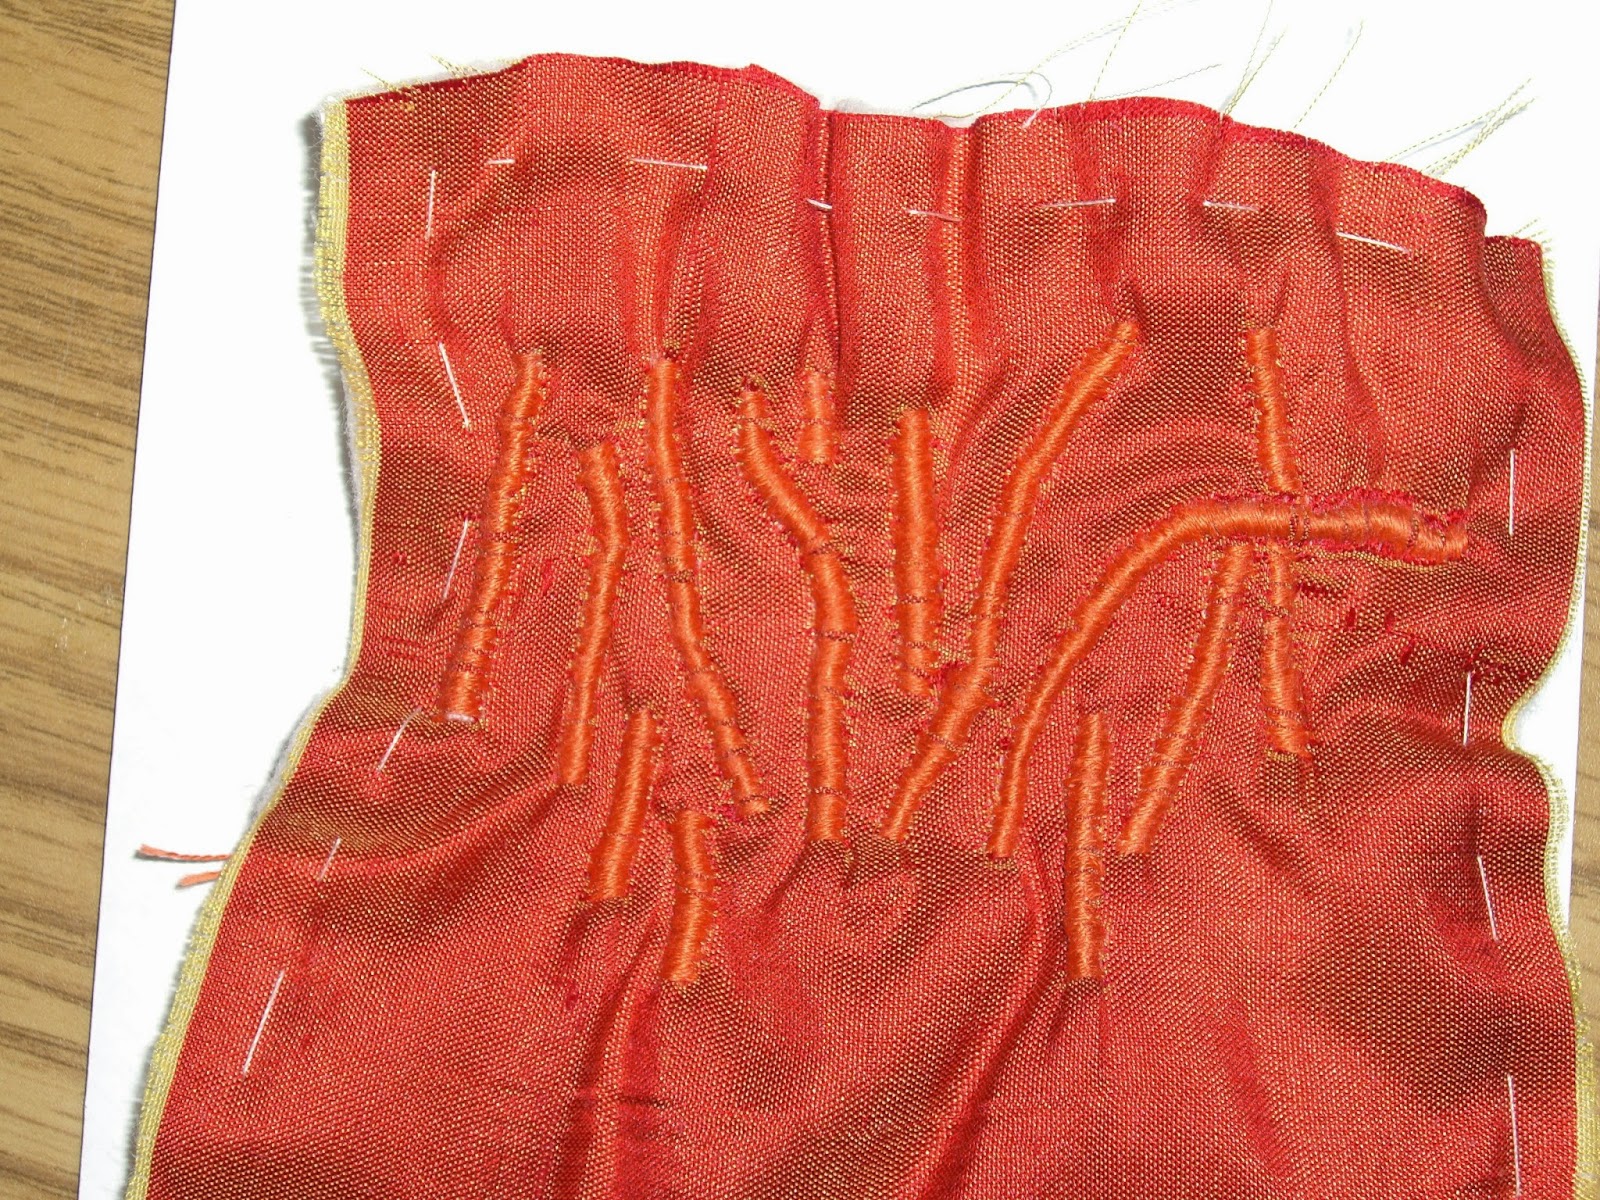
Whilst explaining the background to individual pieces of her work, Sylvia identified sources of inspiration and how certain stitches would come to mind as being the right ones to achieve the desired outcomes. This was the case with stab stitch and an image of lava flow from a volcano from which resulted in a more textural raised piece.
This led to our first challenge - Sylvia had made a square consisting of a layer of cotton, wadding and silk on the top- the aim was to use stab stitch and cord behind the fabric (to give a more raised effect) if desired and experiment exploring the effects of the stitch on the fabric square.

 Once we were all happy with the working of the technique Sylvia introduced the idea of using just one stitch eg straight to create designs. For this she showed us different pieces by textile artists and suggested we try either an apple design which she had brought or an idea of our own.

Apple outline

Transfer of outline

Getting started

Thinking about design and threads


 Apples showing various stages of working and ways of including shading and texture.
 Having completed the designs in one stitch it was time to select another stitch to experiment with in a variety of threads, ribbons and colours. Examples from Sylvia are shown below featuring chain,running, fly and feather stitches.


The samples that follow show various stages of stitch experimentation ranging from those featuring practise of several stitches, variations of one stitch to finished work.


10th July Full day workshop
Inspired by Klimt with Angie Hughes
This was an interesting and enjoyable day – yet the participants
were strangely quiet! This was as Carrie said a sign of concentration with all focusing
on thinking about design possibilities, learning different techniques, using
new materials and applying these in the creation of our ‘pictures’.
Angie interspersed the session with demonstrations and
supported us in our experimentation with Transfoil, Hotspots, KK Glue,
microglitter, foil from sweet wrappers etc.

Resources

Transfoils, glue etc

Examples created by Angie

Discussion with Angie

Can we achieve this?

Experimentation with new resources

Angie's demonstration piece

Applying Bondaweb

Checking position
Time went quickly - we could have done with longer as only
a few managed to try out the machine embroidery stitches that Angie uses in her
work. There were plenty of tips like working diagonally from the top to the bottom of the work and not taking your machine foot off the work this meant working from shape to shape outlining and filling in with 'drunken wiggles'. Other ideas were outlining shapes in straight stitch and then working on the reverse of the piece, also to use an open toe embroidery foot so you can see where you are stitching although if the surface is not smooth then a normal closed circle foot is better. Hopefully our memories of what she showed us and the notes supplied will
enable us to complete our pieces.

Angie works on reverse of piece

Stitching detail
Our work in progress

Many were heard to mutter – I could try this in my next
travelling book. We look forward to seeing many pieces inspired by a variety of
Artists and using the processes developed today.
Finished pieces

22nd May Full day workshop CANCELLED
(Sunflowers with Elizabeth Wall)
17th April 2014 Mini workshop
Needle Felting with Trisha James


27th March 2014 Full day workshop
'Whitework' with Elizabeth Almond


Our aim completed initial

Selecting desired Initial

Transfer onto fabric

Ready to start white work

Liz demonstrates new stitch

Advice from Liz

Work in progress

Colourful whitework

Beginning of design

whitework initial progressing

Backstitch round outline

Whitework with colour!

Inspiration and future projects!

An example of Whitework
Completed Initials


20th March 2014
 Paper Sculpture workshop


January and February workshops (2014)
Clowns


November workshop:
Assisi Work – a new approach by
Maggie Phillips
Wabi Sabi mini workshop with Bex Raven


15th February and 15th March 2018
Mini workshop - 'Free Machine Strips' +' Binding and More'


20th April 2017
4 Square Mini Workshop - Ruth Dalby
 Each member had to pick a piece of paper from 4 different pots - each had a different stitch on it.
We then drew a square (set size) on to our fabric and divided it into 4 smaller squares.
A colour of thread was selected eg green and different thickness /textures of thread were collected together.
 Starting in one of the small squares, at the outside edge, using the thickest thread and one of the stitches 'picked', work approx 4 stitches of different sizes, then move to the next square , use the same thread but a different stitch and repeat the process.
 Continue in each of the 4 squares, then select next thickness of thread and repeat the process using the stitch previously used in the square.
Continue until each square is filled, then select a button and sew on in the middle of the large square, outline the original square with stitch as desired.


 23 rd February 2017
Free Machine Embroidery Flowers with Clair Muir
Clair brought an large range of machine threads for us to use


 The first stage was to create flower pattern pieces and pin on to the washable/disolveable fabric positioned in the hoop.
 Having set up the machine for free embroidery we outlined the flower petal pieces and then filled them in making sure the stitches overlapped otherwise when thew fabric was washed the petals would fall apart.


21st and 22nd April
Creative Surfaces workshop - 1 . 5 days


19th November
Mini Workshop


12th November
Workshop -Inspiration Day with Maryke

15th October
Mini Workshop with Marianne Grime
 'Curly Ribbon Trees'
28th /29th May
2 Day workshop with Isobel Hall
(at Adderley Village Hall)
'Working with Cocoon strippings for Medieval book covers and bags'
16th April
Mini workshop with Brenda Scarman
The main technique for this workshop is to use Detached Buttonhole Stitch to fill the petal shapes of the Tudor Rose. This stitch formed the main part of the elaborate shapes found in costumes of the first Elizabethan era, which were highly decorated, and had gold thread and spangles (sequins) applied, making them very colourful. A modern version of a Chatelaine is what has inspired the designs for this workshop
Our challenge was to make the scissor keeper from the chatelaine,creating the rose using chain stitch, detached buttonhole stitch, enhancing the design with sequins and beads and completing the case lining with satin and sewing together.26th March
Full day - 'Book Structure for Embroidery and Textile Artists'with Mary Sleigh
' Wessex Work' mini workshop with Sue Jones
Margaret
Foster (1843-1936) lived in Bath and continued
stitching well into her 90’s. She called her creation "stitchery"
rather than "embroidery" and it became known as "Wessex
Stitchery" because this was the region she resided in. Wessex in Saxon times was the centre of needlework and the
art of illumination and Margaret Foster gave names to different patterns,
including places of interest and old stories. She made a point of using only
British materials in her work.
Wessex Stitch was a technique that used a limited number of stitches
combined in a great variety of patterns to give surprising decorative effects. Margaret
loved colour
and wasn’t afraid to use it in her designs. (She was not fond of the stamped
work being done at that time and so she went her own way) Also, the backs of her work were not neat as
she carried thread across the back between motifs.
Margaret produced 300 pieces of work for her exhibition in the 1930’s. At that time she was the only person doing
Wessex Stitch. She had a vast knowledge of stitches and techniques like
Elizabethan Blackwork and developed her ideas. She even wrote her own catalogue
for the exhibition
Little is known of Margaret Foster the person, but thanks to her sister
who donated her samples to Gawthorpe Hall; her work is available for all
interested stitchers to see.
Having introduced us to the work of Margaret Sue distributed
the resource packs containing information about the stitch we were going to
focus on, sample fabric and thread to practice
on in order to familiarise ourselves with the technique and a larger piece of
fabric to work our design on. Sue had also brought a lovely colourful selection
of threads, plus needles and frames for those without.
The workshop was informative and enjoyable but required
concentration in order to count threads to ensure the evenness of the stitches
and design. Requests were made for a further session using a different stitch
of stitches.
15th January 2015
‘Little Silky Pictures’ mini workshop with Trisha James
20th November
‘Let's Get Knotted’ mini workshop with Val Mackin
The aim is for everyone to have fun whilst learning to tie a variety of knots. Start with a Carrick knot and make a coaster to ensure understanding of how the knot is formed.
Other knots like the Turks Head, Ocean Mat and Lanyard knot can be tried.
Other knots like the Turks Head, Ocean Mat and Lanyard knot can be tried.
13th November
‘Two Stitches’ workshop with Sylvia Stead Sylvia brought in many pieces of her work as well as a selection of threads, ribbon etc together with her collection of stitch samples to give us ideas about how we could vary each stitch and create different effects with it.
Whilst explaining the background to individual pieces of her work, Sylvia identified sources of inspiration and how certain stitches would come to mind as being the right ones to achieve the desired outcomes. This was the case with stab stitch and an image of lava flow from a volcano from which resulted in a more textural raised piece.
This led to our first challenge - Sylvia had made a square consisting of a layer of cotton, wadding and silk on the top- the aim was to use stab stitch and cord behind the fabric (to give a more raised effect) if desired and experiment exploring the effects of the stitch on the fabric square.
|
| Apple outline |
|
| Transfer of outline |
|
| Getting started |
|
| Thinking about design and threads |
Apples showing various stages of working and ways of including shading and texture. Having completed the designs in one stitch it was time to select another stitch to experiment with in a variety of threads, ribbons and colours. Examples from Sylvia are shown below featuring chain,running, fly and feather stitches.The samples that follow show various stages of stitch experimentation ranging from those featuring practise of several stitches, variations of one stitch to finished work.
10th July Full day workshop
Inspired by Klimt with Angie Hughes
This was an interesting and enjoyable day – yet the participants
were strangely quiet! This was as Carrie said a sign of concentration with all focusing
on thinking about design possibilities, learning different techniques, using
new materials and applying these in the creation of our ‘pictures’.
Angie interspersed the session with demonstrations and
supported us in our experimentation with Transfoil, Hotspots, KK Glue,
microglitter, foil from sweet wrappers etc.
| | ||
| Resources |
|
| Transfoils, glue etc |
| | |||
| Examples created by Angie |
|
| Discussion with Angie |
|
| Can we achieve this? |
|
| Experimentation with new resources |
|
| Angie's demonstration piece |
|
| Applying Bondaweb |
|
| Checking position |
Time went quickly - we could have done with longer as only a few managed to try out the machine embroidery stitches that Angie uses in her work. There were plenty of tips like working diagonally from the top to the bottom of the work and not taking your machine foot off the work this meant working from shape to shape outlining and filling in with 'drunken wiggles'. Other ideas were outlining shapes in straight stitch and then working on the reverse of the piece, also to use an open toe embroidery foot so you can see where you are stitching although if the surface is not smooth then a normal closed circle foot is better. Hopefully our memories of what she showed us and the notes supplied will enable us to complete our pieces.
|
| Angie works on reverse of piece |
|
| Stitching detail |
Our work in progress
|
Many were heard to mutter – I could try this in my next travelling book. We look forward to seeing many pieces inspired by a variety of Artists and using the processes developed today.
Finished pieces
22nd May Full day workshop CANCELLED
(Sunflowers with Elizabeth Wall)
17th April 2014 Mini workshop
Needle Felting with Trisha James
27th March 2014 Full day workshop
'Whitework' with Elizabeth Almond
|
| Our aim completed initial |
|
| Selecting desired Initial |
|
| Transfer onto fabric |
|
| Ready to start white work |
|
| Liz demonstrates new stitch |
|
| Advice from Liz |
|
| Work in progress |
|
| Colourful whitework |
|
| Beginning of design |
|
| whitework initial progressing |
|
| Backstitch round outline |
|
| Whitework with colour! |
|
| Inspiration and future projects! |
|
| An example of Whitework |
Completed Initials
20th March 2014
Paper Sculpture workshop January and February workshops (2014)
Clowns
November workshop:
 Assisi is a technique where the background of a
design is sewn, and the front is left void. (It is sometimes known as voided
work.)
Assisi is a technique where the background of a
design is sewn, and the front is left void. (It is sometimes known as voided
work.)
It has become associated with the Italian town of
Assisi but the idea of leaving the design 'void' was common in Italy.
 Traditionally the background is in one colour
(usually red, blue or green) and is worked in cross stitch with any outlines
done in Holbein stitch. Common motifs include paired birds or animals and also
mythical subjects.
Traditionally the background is in one colour
(usually red, blue or green) and is worked in cross stitch with any outlines
done in Holbein stitch. Common motifs include paired birds or animals and also
mythical subjects.
Maggie introduced the Assisi work and we then selected
from the range of kits that on display the one we wanted to try. All we
required to get started was the ability to follow the planned design and to be
able to use Holbein and Cross stitch.
 |
| Concentration on both stitching and the plan |

Maggie available for help and advice

 Examples of kits with the reverse being as neat as the front of the work.


June
Full day workshop - Goldwork Embroidery by Sarah Rakestraw of Golden Hinde
This was our opportunity to learn the technique of Or Nou
which is creating a design with Jap (the gold thread) and thread (coloured
stranded embroidery thread in our case).
As well as this Sarah had also brought a selection of
threads, fabric including silk, cotton, leather, scissors, frames, beads, books and kits so we could purchase any additional items required for our workshop or
future projects in Goldwork.


Sarah and Sue had a
selection of 4 designs which they use, however the ‘flower' which was
surrounded by a circle of gold was complex and time consuming requiring a 2 day
workshop, although the others were achievable. The designs were a ‘feather/wing’,
a ‘Celtic Bird' and a ‘Maori Symbol’ and we were encouraged to select based on our interest
rather than being guided by factors like simplicity, quickest to develop etc.


Once the design was selected we were provided with a kit
which contained a coloured postcard of our design to guide us as we worked, two
5m lengths of Jap(T69) and a selection of embroidery threads of appropriate
colours.
Our first task was to transfer the outline of the chosen
design on to our selected fabric (silk or linen) using a silver or gold gel
pen. The paper with the design on was secured to the back of the fabric in the
frame with tape, a light box made it easier to see the outline allowing for
accurate transfer, then the paper design was removed, a backing piece of cotton
fabric placed under the silk/linen in the frame and then we were ready for the
next stage.


 | |||
| Sue showing samples of gold work |
 |
| Concentration and the opportunity for a break |
 To insert the ends of the Jap into the fabric we needed to
select a crewel /darning needle which had a point and an eye which was
sufficiently large to accommodate the thickness of the Jap easily. Two threads
of Jap are used at a time but they are inserted through the fabric separately
and then couched over with the thread to secure.
To insert the ends of the Jap into the fabric we needed to
select a crewel /darning needle which had a point and an eye which was
sufficiently large to accommodate the thickness of the Jap easily. Two threads
of Jap are used at a time but they are inserted through the fabric separately
and then couched over with the thread to secure. |
| Sarah demonstrating one of the gold work techniques |
Those who selected the feather/wing design then used the
embroidery thread and a couching stitch to hold the two threads of Jap to the
surface of the fabric along the outside edge of the design ensuring that the
gel pen outline was covered. The other two designs required the Jap to be
couched on in a gold coloured or invisible thread which required the
application of bee’s wax to ‘stiffen’ the thread.
Good eye sight, concentration and a steady hand was then
required to recreate the design using the postcard for guidance as to colour of
thread, density of couching, distance each colour was required for etc.
March and April - Linus Quilts
Project Linus was named after the
security blanket toting character from the Peanuts comic strip.
Project Linus began in America in 1995 when Karen Loucks saw a newspaper article showing how much a comfort blanket had helped a child cancer victim and decided to organise blankets for her local children’s cancer unit and started spreading the word. Since that time over 4 million blankets and quilts have been delivered worldwide.
 |
| Finding out about the project and examples of quilts |
The organisation began in the UK in March 2000 as a result of a quilter’s desire to help children in need. Our volunteers deliver about 2,000 quilts and blankets to sick, disabled or disadvantaged children across the UK each month.
Quilts
and blankets can go to any child who is in need of cheering and comforting.
Hospitals, hospices and refuges are popular but if you know of any child or children's
organisation that would benefit, please let us know and we will try to help
 |
| Examples of quilts and materials to make them |
 |
| Reverse of quilt |
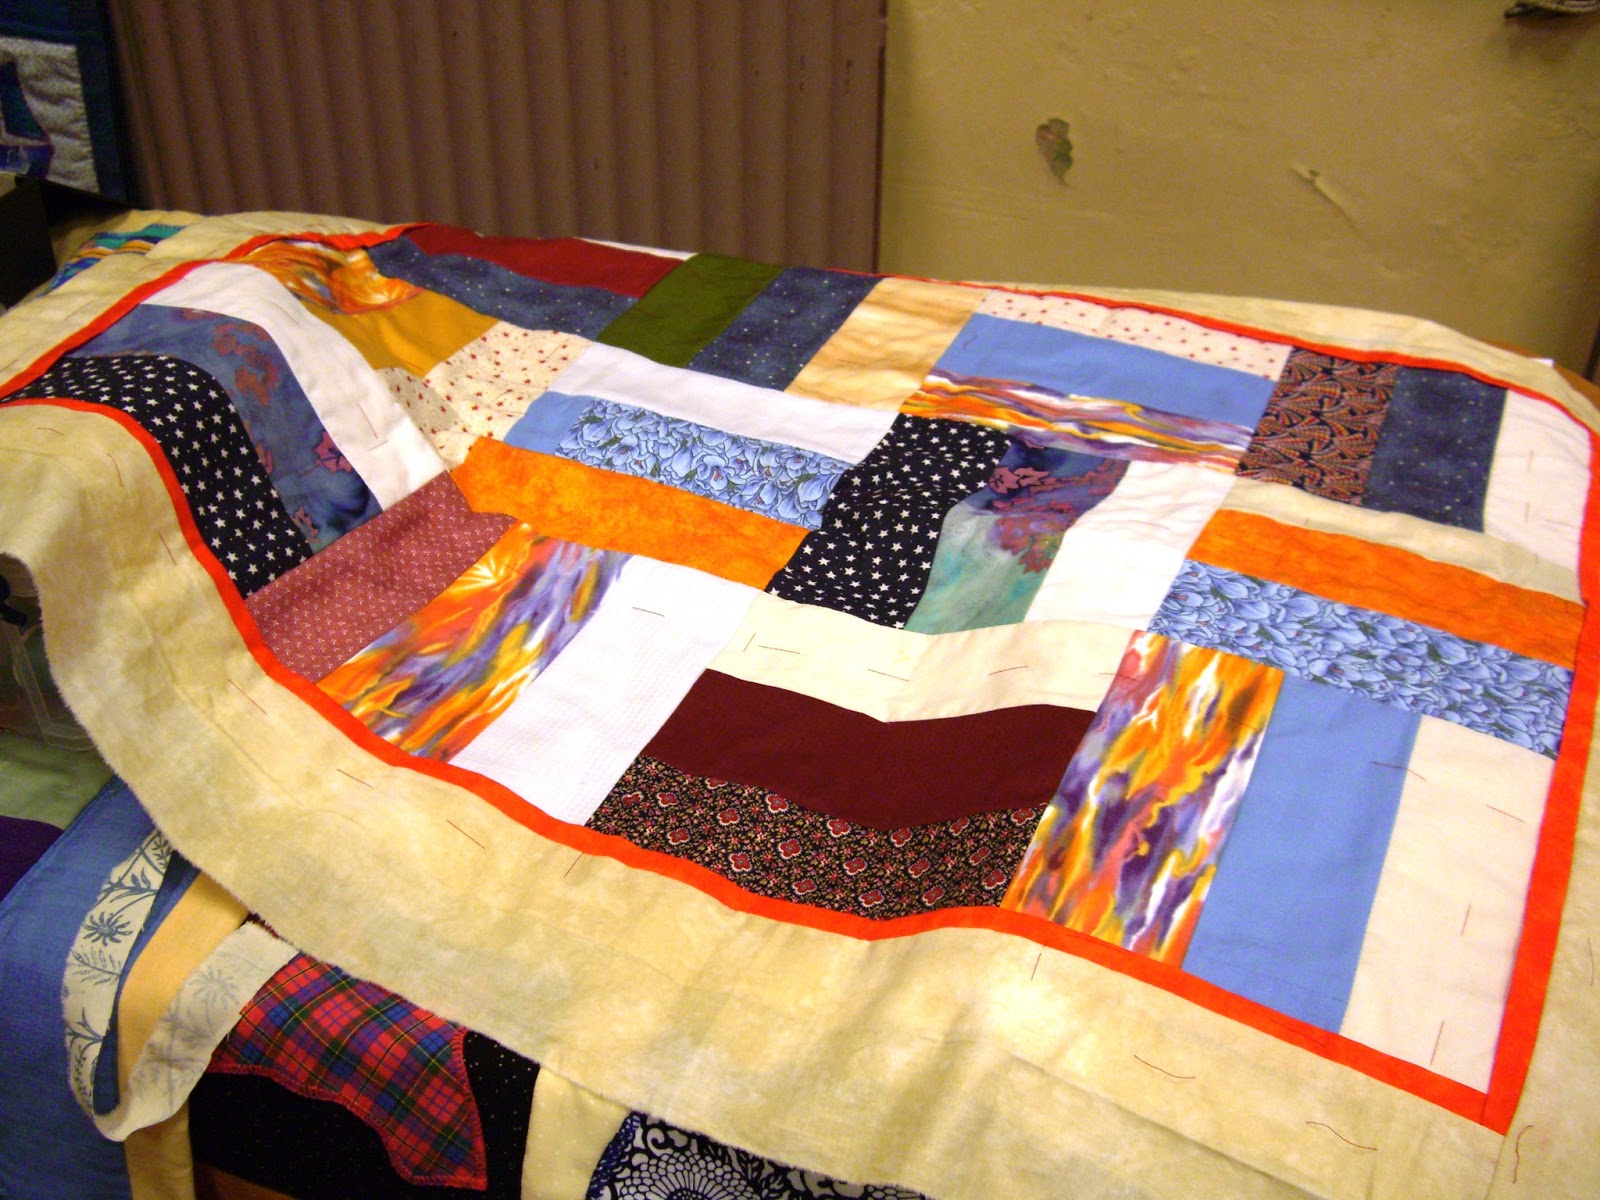 |
| Example of completed quilt |
Project
Linus can use all sizes and types of quilts as long as they are machine
washable, robustly made and do not have any buttons or lacey bits that could
get pulled off or snag tiny fingers.
Over the two workshop sessions (March and April) the members have each
made a patchwork quilt for the project. We started with 12 material squares and
could select shapes to appliqué on to these, our choices were ‘Kites’, ‘Dogs’,
‘Butterflies’ ‘Yachts’’,’Circles’.
 |
| Starting to sew the shapes onto fabric squares |
Once chosen we started to embroider the shapes in position and enhance as required to make them attractive.
 |
| Dogs were a popular choice |
 |
| Collars enhanced the dogs |
 |
| Boats were more complicated with 3 parts and the waves |
The squares were then sewn together lengthwise in strips of 4 which were then sewn together to form a 3x4 square quilt.
 |
| Squares sewn together and border added |
 |
| Sewing the squares together into strips |
 | ||
| Pressing the edges of border ready to apply the backing fabric |
A border was then added all round and pressed in half, wadding and a backing piece were added, the border folded over to encase the edges and the quilting process was ready to start. This would hold the layers firmly together as well as enhancing the quilt.
 |
| Adding the backing and tacking to hold in position prior to quilting |
 |
| Quilting the border |
 |
| Quilting along the centre joins using quilting threads |
Members worked hard making their quilts for Project Linus in the knowledge that they were helping babies, children and young people by bringing comfort to them.
March - Lutradur Large Leaf Tea Light Workshop
 |
| Cutting out the leaf shapes |
 |
| Soldering iron used to gain accurate shapes |
 |
| Drying the decoration on the leaf |
 |
| Applying decoration to the coloured leaves |
 |
| Speeding up the drying of colour and decoration |
 |
| Creating the 3D leaf shape by stitching |
 |
| Group and finished lights |
 |
| Finished Leaf Lights |
 |
| Group and finished lights |
 |
| Group including Jean the photographer |